Home About Me My Store Freebies Pinterest Facebook Instagram TeachersPayTeachers Email Twitter Image Map

Christmas Tree Craft and Bulletin Board

christmas tree craft and bulletin board
How are your bulletin boards? Are they seasonal? Do they showcase student work? Keep reading to learn how I put together a bulletin board that gives the students a bit of a challenge while having some seasonal fun!

If you need something quick and easy, click the link below:
Quick and Easy Christmas Ornament

For this project you will need:
  • watercolor paints (brushes, water)
  • 9 x 12 white construction paper
  • 9 x 12 green construction paper
  • tree and star templates (I made mine using heavy cardstock)
  • glue
  • pencils
  • scissors
1. Students paint various color blocks on the construction paper. Allow the paper to dry overnight.
christmas tree craft and bulletin board

2. Students trace the star and tree (without the holes) on their construction paper. I always explain that their placement of the tree will impact what will eventually show through the holes. So, fiddle around with where to place the tree. (Just be certain to leave enough room to trace the star too!)

christmas tree craft and bulletin board

3. Students cut out the tree and star.

christmas tree craft and bulletin board

4. Students trace the tree again (this time with the holes) on the green construction paper. Cut out the tree and the holes. Cutting the holes is very tricky for some students. I like to teach the "poke a hole with your pencil, then cut" procedure.

christmas tree craft and bulletin board

4. Students glue the green tree on top of their colored tree. I usually turn it over so the pencil lines do not show. And, add the star to the top!

christmas tree craft and bulletin board

Once the trees are done, I staple them to the board. This year I added the words "Merry and Bright". Michelle Griffo from Apples and ABC's has them available in her store. 

You can find them in the MEGA Bundle here:

Or, you can purchase just the Christmas Bulletin Board set here:

I simply printed the letters on colored copy paper, cut them out, and stapled them to the board. 

christmas tree craft and bulletin board
Final Bulletin Board
I've done this activity with students from kindergarten to fourth grade. I usually have classroom volunteers do the majority of the steps. It's a great way for students to practice fine motor skills, apply spacial reasoning, and have a seasonal craft to take home! Plus, it makes a really nice bulletin board!

christmas tree craft and bulletin board

Happy Holidays!

Giving Thanks 2017

Another year has passed and the holiday season is upon us once again. This is my favorite time of the year. Although I like to reflect on all the things to be thankful for on a regular and consistent basis, as this Thanksgiving approaches, I would like to especially thank someone who has made a tremendous impact on my life and my students' lives: Mary Beth from Brain Waves Instruction.

I learned about Brain Waves Instruction a year and a half ago. I started out using the free offerings and immediatly was impressed with the thoroughness and practicality of her resources. As time went on, I tried different resources (free and paid) and was amazed at the level of student response and engagement. 

Below is a sampling of what Brain Waves Instruction can offer you and your students:
(Grades 3-5)

My students (and I) love these! I use them for the awkward 10 minutes I have in my schedule between specials and when students need to leave to go to providers for Guided Reading. 

Students get one sheet per week. Terms are grouped by theme and students are asked to complete a vocab activity involving the term and then add their own doodle to reinforce the meaning. 

We go over the term and definition for 5-7 minutes and then the students get their "2 minute doodle". Each word section is short enough that I can fit it in. They are powerful enough that the terms and definitions "stick" with the students. It was a great moment last month when a student recognized the term "constellation" within their novel study and connected it to the Daily Doodle Mary Beth had created that was themed around outer space. What a teaching win!

(Intermediate Grades and Middle School)

I admit that my poetry "game" is weak. I am always looking for resources to make it easier and less painful. Mary Beth has it all! 

I teach 4th grade and most of her resources are designed for Middle School. But, I have found with a bit of slower pacing and introducing the nuts and bolts of the activity during small group instruction- fourth graders can do it.

I use this one to create an instant bulletin board in the spring. I copy the poetry paper on colored paper to give a bit more visual appeal to the board.


This was a great way to cover poetry and have some fun during Halloween. The students were having so much fun with the content and design of the resource, I don't think they realized how much they were learning.

(Intermediate Grades and Middle School)

I love EVERYTHING Doodle and Do! I am not exaggerating. If Mary Beth uses the term "doodle" anywhere near a resource- I want it!


Mary Beth offers a range of fiction and non-fiction skills. If you are looking for some carefully thought out, well paced instruction for a specific skill, you can't go wrong with a Doodle and Do.

These resources typically offer two options: use in a center or individual booklets. I usually have the Doodle and Do skill sets made into individualized student booklets (used during small group lessons). 

For added fun, I sometimes have the students work through the booklets using a flair pen. Doodle and Do + Flair Pens = Happy Students.

My students love Doodle and Do so much they will work on the "extras" during their lunch and recess.


AWESOME COLLABORATIONS

Along with her amazing stuff in her Teachers Pay Teachers store, she also teams up with some equally amazing teachers to offer collaborative goodies! 

Oftentimes, Mary Beth teams up with Jenny from Art with Jenny K. When these two get together I know I'm in for the best from both sides of the brain!

And, this past summer she teamed up with Rachael from The Classroom Nook to bring us "School Year Solutions: Getting Your Year in Gear".
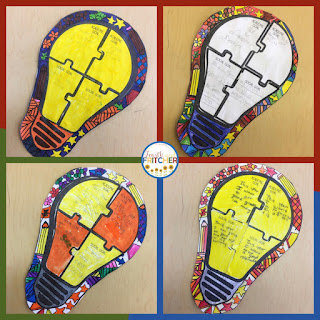
Students set 2 academic goals and 2 social goals in September.
Each goal was written into a puzzle piece.
The puzzle pieces fit together to make their light bulb!
Mary Beth is also one of the coordinators for the TpT Flock (the annual Northeast Teachers Pay Teachers Meet Up). Her energetic personality and winning smile always makes for a memorable event.

Thank Mary Beth, for being an amazing individual and educator! I am so grateful to have met you! Your resources have helped make my classroom an engaging and meaningful place for me and my students. 


Happy Thanksgiving!

Classroom Furniture

We've all seen those classrooms with amazing furniture. Ya know, carefully crafted pieces that seamlessly mesh into their classroom environment. The furniture envy can run deep. I am especially envious of teachers that are allowed to have over-stuffed, fluffy items; the exact furniture in which I myself would want to curl up into and read a book. The fire code where I live prohibits such things. Heck, I have a better shot at a pit viper for a class pet than a rug on the floor.

This summer I decided to forge ahead and find some new furniture. Something sturdy and wooden. Maybe a bench. And a round table. I HAD to have a round table. Believe it or not, I've been at this teaching gig for nearly 20 years and have NEVER had a round table. I want one- now.

So, I began my pursuit. I didn't want to spend crazy amounts of money. I am fully aware of what is going to happen to this stuff once it enters my classroom. Thus, the ideal blend of economy and durability became my focus.

Initially, I figured I would need to do some serious mileage at yard sales. But, I was wrong. The internet makes shopping so convenient. I hopped onto a couple of social media sites where people post their stuff; an internet garage sale, if you will.

In less than a week I found exactly what I was looking for. I was even able to negotiate two different pickups the same day. Perfect!

Now began the process of preparing them for the classroom. I knew that to save money on the purchase I would have to buy items that needed some TLC. I decided to sand and paint them. 

Materials:
6' Ethan Allen Bench - $45.00
Wooden Table and 3 Chairs - $35.00
1/4 Sheet Finishing Sander [hubby's]
Sandpaper (40 grit, 80 grit, and 120 grit) - $5.00
2 1/2 Cans of Valspar Red Spray Paint + Primer - $5/can
2 Cans of Rust-oleum Black Spray Paint + Primer in One- $5/can
Brackets - $2 for 2 [located in cabinet/door pull isles in hardware department]
Tack Cloth - $2.00

THE BENCH
The well-loved bench came from a man who told the tale of how his family had outgrown its use. His children and grandchildren had used it throughout the years but it no long fit their need. Lucky me!

Step 1: Sanding
I didn't worry too much about getting down to bare wood or eliminating every ding and scratch. I knew I was going to spray paint and, let's face it, it's going to encounter a few more nicks and scrapes in this next life.

The electric sander did the larger parts. For the spindles, I hand-sanded using a smaller piece of sandpaper. The goal was to scuff it up enough to hold the paint. 
Step 2: Tack Cloth
This is an icky (yet important) step. Wipe the furniture down with a tack cloth. The cloth will pick up the smallest dust particles so the paint has a nice clean surface to adhere to.

To note: Tack Cloth feels "tacky" because that's its job. You will get a gummy, sticky feeling on your hands. But, it does wash off easily. If you want to avoid the sensory invasion all together- wear a pair of disposable gloves.

Step 3: Paint + Primer 
I chose to buy paint + primer. Faster and easier. I used 2 full cans for this bench. The trigger on these cans was so much easier than the traditional pointer finger release. These triggers are akin to a spray bottle trigger; you use your hand to squeeze rather than a finger to press down. I will look for that type of trigger for future projects.
Step 3: Done!
THE TABLE
The table came with three chairs. Initially, I planned to paint and use the chairs too, but after reconsideration, I chose not to. The woman I bought them from was kind enough to have the table taken apart when we picked it up. That made the painting process and transporting to school so much easier.

This table had an option for extension leaves with an opening in the middle. I didn't have (or want) the leaves. Remember, I wanted a ROUND table. Before I sanded and painted, hubby screwed two brackets into the underside to keep the halves from opening.
Step 1: Sanding
The table was a bit different because the table top was a veneer. But, I went ahead and scuffed it up to get it ready. I did use a coarser sandpaper (40) to dig down a bit more. Then I went over that with 80. Again, the aim wasn't a perfectly smooth finish- I just wanted the paint to stick.
Step 2: Tack Cloth

Step 3: Paint + Primer 
Valspar had a great red! I was looking for a particular kind of red that would blend with the other red in my class. Word of caution- check the back labels (not the UPC codes) because I accidentally picked up two "different" reds and did not notice until I sprayed the second, different red on the table. Thankfully, I had other cans that DID match the red that was already sprayed on the table.

I used 2 and half cans for the table. Once I was done with the red, hubby painted 2 coats of a protective clear coat.
Overall, I spent a little more than $100.00. My classroom now has an awesome bench and the much-coveted round table. Plus, I was able to customize the colors. This was a very easy process. The end result was worth the time and effort on my part to get the "just right" furniture and the "just right" colors. Who knows? I might start looking for the next project...I do have materials left over. 


What EVERY Teacher Needs

When I was a student teacher, my Master Teacher taught me a lot of things. But, there was one piece of advice that I would like to share with you. This simple suggestion has helped me through some tough days and even tougher years...

Keep Your Cards

teacher self-care
I remember her opening the drawer of her desk and showing me dozens and dozens of cards and notes. Some were handwritten on sticky notes, some were elaborate greeting cards. All of them had words of praise and thanks.

She explained that there would be times in my career when I would get tired, when I would feel unappreciated. When I might not want to teach anymore. I couldn't imagine such a thing; but she was right.

Thankfully, when the darker moments of teaching happened, I was able to pull open my own desk drawer and sift through the cards and notes I had accumulated. I also have small trinkets and drawings that have been gifts as well. They are all a saving grace. The words and memories have helped keep me centered. They remind me of why I teach and they whisper words of encouragement when negativity shouts in my ear.
teacher self-care
This year I am ditching my desk. I need to find a new home for my cards and notes. They have become my lighthouse in a stormy sea more than once and there is no way I am going to throw them away.

I have a Star Wars storage box that was a gift from a student a couple of years ago. It seems like a perfect fit.
teacher self-care
With my desk gone, I will place my box in a place where I can always see it; where with one glance I can remember the positive impact I have had throughout the years. As future student teachers make their way through my classroom I will be sure to pass on the advice my Master Teacher gave me and have them start their own box of encouragement...starting with the card I give them.
teacher self-care

3 Ways to Use a Parts of Speech Word Wall

So, you've created a Parts of Speech Word Wall. Now, what are you going to do with it? Keep reading to learn my top 3 fav ways to use one!

If you are new to Parts of Speech Word Walls you can read about them here: Word Walls for Big Kids

Using the fundamental sequence needed for language development (hear, speak, read, write) I use activities that address gaps, keep up the rigor, and offer differentiation. I use this sequence of events when using new words on the wall.

As with any new activity in a classroom, I model the expectation first. At the start of the year, I go through the steps slowly and deliberately. I use either a whole group setting (not very often) or my teacher-led rotation.


1. Speak in Sentences


When new words go on the wall, I like to spend a couple of days just saying them with the students. Some words they need to hear over and over before I can expect them to say them. For example: indictment, suffragist, abolitionist...

Once students are more comfortable saying the words, challenge them to create a sentence that incorporates one noun and one verb from the wall. If you have color-coded your words, students can sometimes find words that are related by subject a bit easier.

I sometimes use chart paper to show students the steps. The chart does help with discussion about noun/verb agreement and how the ending of words need to change based on the sentence we are saying or writing. But, overall, this is designed to be a verbal activity. The end goal is to get them to speak in sentences. Writing is later.

2. Making and Breaking Words

Once students have a decent handle on saying the words and speaking in sentences, I move into making and breaking words. This is a great activity to have students complete with a partner. 

Students are provided a set of letters and a mat. I time the activity and the goal is to make as many words possible using the provided letters. At the beginning of the year students struggle a bit with manipulating the letters and finding new words. However, a few rounds of practice and they become pros. I do provide a line at the bottom of the mat for the "bonus" word. (The word from which all other words are derived.) Students become savvy and understand to get the wall and find the bonus word first, then they arrange letters to add to the mat. 

I collect the mats and we take a few minutes to go over the different words students found. I also (sometimes) award the pair that found the most legitimate words.


3. Building Sentences

Now that students have a handle on speaking the words and have had an opportunity to manipulate the sounds and letters, it's time to write! Similar to the Making Words Mat, students get a Making Sentences Mat. Either working in pairs or independently, students choose one noun and one verb from the wall and build a sentence. 

When students have had enough practice speaking in sentences, they can usually fill in their mat without too much assistance. If they are really proficient, I ask them to enhance their sentence(s) by adding in more nouns or verbs, or they can select words from the Adj/Adv section of the wall.
By time students are building sentences they have had many exposures to and practice with the words on the wall. I like to keep words up longer than "necessary". I have found that some students like to mix and match words from different units of study. Some students like the comfort of already knowing some of the words on the wall. Other students like to have the extended time to challenge themselves with words that they didn't quite master during the unit. Once you get your wall going, you'll find the right flow for your classroom.

I'd love to hear from you! How do you use your word wall?

2 Items That Will Keep Your Students in the Room


It can be frustrating when you are in the middle of a lesson and a student has to leave for the nurse. I'm not referring to true medical necessities (diabetes, vomit, etc...). I mean those tiny little hiccups that add up to too many minutes of missed instructional time. The 2 most frequent little hiccups I've encountered: blood issues (picked scabs/hang nails/paper cuts) and chapped lips.
So, there are two items that I stockpile religiously in my classroom:

1. Band-Aids
These are a must-have. In fact, if I could choose only one item to keep on hand, band-aids would be it. From the simplest paper-cut, to picked scabs that transform into mini blood domes, band-aids help stop the bio-hazards from flowing and get the students back on task. A quick wash-rinse-bandage and it's back to business as usual. "No, you don't need the nurse. I have a band-aid right here!"

After the first few attempts to leave the room, they learn to simply come to me and I will supply the needed bandage. Better yet, they stop picking scabs altogether as a means to leave!

2. Lip Stuff
This one can be tricky. But, it's a fantastic remedy when chapped lips start to appear. I keep a tube of Vaseline-like lip balm available. When cracked, dry lips become too much and a student wants to go to the nurse for some relief, I grab my handy tube and keep him/her in the room.

The caveat to this nurse-denying trick is that I am the only one allowed to touch the tube. To keep things sanitary there are two ways you can deliver the much-needed balm. You can squeeze it onto a student's finger (I hold their finger so they don't accidentally touch their finger to the tube) or you can squeeze some on a tissue or paper towel. Then, the student smooths out those distracting ridges and gets back to work!

These 2 simple items will lead to less instructional time being missed and give needed relief to those students who may encounter blood or chapped lips during the day.

What are your full-proof ways of keeping students in the room?


Refocusing Your Students for the Rest of the Year

refocusing elementary class end of year

There are certain times of the year when students need to be reminded of the rules in a more structured, formal capacity. Traditionally, those times are most prevalent right around Thanksgiving and again in the spring. Although, the spring reminder moves around depending on when Easter, the spring break, and State testing occur (and if there is a full moon)!

I use a blend of Whole Brain Teaching, Class Dojo, and a hodge-podge of tricks and tips I've acquired during my time in the trenches. There are quite a few classroom management systems in place. The students hear the rules and/or experience reinforcement of them in small degrees throughout the year. But, springtime offers an opportunity to help the students refresh their understanding of the rules so that the year can finish off as smoothly and painlessly as possible!

I saw an idea from 2nd Grade Sassy Pants and decided to give it a shot. I made a few adjustments to meet the needs of my classroom. 

refocusing elementary class end of year anchor chart
Finished Anchor Chart


This easy anchor chart can be made by using the following steps...


You Will Need:

  • chart paper
  • colored markers
  • sticky notes
  • pencils


Time Frame:

  • < 30 minutes


Procedure:

  • Prep the chart paper with whichever heading works for your students.
  • Write out a few sticky notes that have "acceptable" and "unacceptable" behaviors on them. For this chart I color-coded the stickies (green and red) and keep them out of sight until we discussed them as a whole group.
  • Ask students to give a thumbs ups or a thumbs down to indicate which section of the chart the sticky belongs on.
  • In pairs (or triads) have students write down an additional behavior to be added to the chart.
  • Add the red "no" slash or the green star as you and your students discuss their sticky notes.
  • Add the student suggestions to the correct side.
  • Display the anchor chart to remind students of acceptable and unacceptable behaviors.
refocusing elementary class end of year

refocusing elementary class end of year


Overall, this was a success! Behaviors were immediately adjusted for the better. And, I now have an additional resource in the classroom for students to refer to when the need arises. The interactive piece was a hit in my room. The students loved sharing their ideas and they added a few things that I wouldn't have thought to include. 

Give it a try and let me know how it works out for you!

refocusing elementary class end of year

Word Walls for Big Kids


Word Walls take up a lot of space. If you are like most teachers, you value bulletin boards, so you're not about to waste this precious real estate on something that isn't going to be functional. Some would say that we are even willing to sacrifice a bit of "fashion" for an increase in function! 

When I taught kindergarten, I used an alphabetical word wall. But, once I switched to fourth grade, it didn't seem to make much sense. With 26 letters to contend with, the word wall took up a lot of space, and wasn't the most functional part of the classroom. Students relied more on personal dictionaries or inventive spelling while writing. A word wall at the fourth grade level became a never-ending albatross that was mostly unused and only added a moderate aesthetic value. So, I stopped putting one up.
The fourth grade word wall in September.
THE BIG SWITCH
A couple of years ago I attended some training and was introduced to the concept of a word wall organized by parts of speech. A huge light bulb went off and it's been glowing ever since.

I now arrange my WORD WALL by parts of speech into four categories: 
*NOUNS     *VERBS     *ADJ/ADV     *OTHER


The white cards were added by students based
on a text they were reading.
The four categories help the students better understand parts of speech and the concept that a combination of a noun and a verb are needed to create complete sentences.

I add words to the wall when we begin new units of study. The students use it during various activities such as making and breaking words or building sentences. Additionally, words on the wall are in their "simplest form". Ex: nouns are singular and simple verbs are present tense.

I do color code the words based on units of study. And, there are times when words are repeated. The repetition helps reinforce the importance of the words. Ex: detail, setting, explain. And the repetition gives students another opportunity to work with the words again. I also pick and chose words for the wall that will be encountered most often. And, at times, the students will choose words from the text that they feel should be added to the wall.

Using a Parts of Speech Word Wall is a much more organic approach to vocabulary. I find the students refer back to it often and I especially love the chatter of excitement when I've added words to the wall a day or two before a new unit. My students are always buzzing about what they think the new unit of study will be!

Three units of study on display.

Read about 3 different ways you can use your Parts of Speech Word Wall here:
3 Way to Use a Parts of Speech Word Wall

Color-Coded Paragraphs Writing Strategy

color-coded paragraphs writing process strategy
I'm not sure what the novelty is, but my students LOVE to write with pens. Truth be told, they will write with anything that isn't a pencil! They love it so much, that they will pay (with Dojo Dollars earned during the week) for the privilege of using a pen for the day.

It's not a new concept to use pens or color to help engage students with tasks or to organize writing, but I thought I would share with you how I've implemented and continue to use this strategy to help meet the needs of every student in my class (even those that are most challenged when trying to tackle a writing assignment).

1. Post an Anchor Chart

color-coded paragraphs writing process strategy
Classroom Anchor Chart
To stay consistent, I use the same color of marker to code the anchor chart, graphic organizers, and written drafts. The fact that "conclusions" has its own color has shifted the mindset of what conclusions should sound like and how to structure them to fit the writing piece.

I picked red, blue, and black because they are the most common pen colors. However, feel free to choose whichever colors work best for you!

2. Code the Graphic Organizer

As students fill in their graphic organizer, have them use the corresponding color! You can either have the students write in pencil (and then circle the parts in color) or have them write the notes in pen.

color-coded paragraphs writing process strategy
Color Coded Organizer
With this organizer, the students were working in their "expert trade groups" to complete the organizer. Using the color helped them determine the structure of the paragraph when moving from organizer to draft. If you stay consistent with color coding organizers, the students will be able to transfer their notes easily because it's the color guiding their text structure and not necessarily the organizer. In a sense, you are keeping the process consistent regardless of changes in the organizer or the content.

3. Draft in Pen

Yup. That's right. Draft in pen. Why not? It's a draft and subject to changes anyway. If following the writing process, it should be changed as it moves to final draft. Whether you skip lines or not, students can adjust their writing later on. I don't let scribbles and cross outs drive me crazy. In fact, I prefer them. It gives the students an authentic look at drafting and dispels the notion that drafts should "look perfect" and that one should erase and re-write in order to edit/revise. Bring on the pens and watch the creativity shift in ways you never imagined!
color-coded paragraphs writing process strategy
Student Draft
As the year progresses, students will find their own comfort level with pens and during which parts of the writing process they prefer to use pen. I keep a healthy supply available at all times and stay consistent with the three colors. I do incorporate other way to have fun with pens (#3 Choice Day), but for the writing process, I limit it to what you see in the process outlined above. 

How do you making writing more engaging in your classroom? Comment below. I would love to hear your suggestions!
color-coded paragraphs writing process strategy