Home About Me My Store Freebies Pinterest Facebook Instagram TeachersPayTeachers Email Twitter Image Map

Easy Candy Cane Christmas Ornaments

easy candy cane ornaments elementary classroom

It's that time of the year! Are you the kind of teacher that goes "all in"? The tree is up the Monday after Thanksgiving with ornaments and twinkle lights spread throughout the room. The yearly construction paper fireplace has found its annual home on your hallway bulletin board. Is that you? Well, then, you don't need this blog post.

You may be interested in this lengthier project:
Lengthier (and ready-made bulletin board) Classroom Christmas Craft

This post is for the teacher that is waiting for the Christmas miracle to happen. The one where the blank bulletin board that has sun-faded spots from Halloween pumpkins will magically decorate itself. Or perhaps some elves will show some mercy and get the glitter and cotton balls to beautifully accent the classroom projects while simultaneously avoiding the mess that comes along with such cute adornments.

I offer an EASY CHRISTMAS ORNAMENT! Seriously, it's so easy. This ornament can be done with minimal supplies and time. Win-Win!

You will need:
- cardstock (maybe- you could use construction paper)
- tissue paper cut into squares (perhaps cut, perhaps not)
- liquid glue (absolutely- you need liquid glue)

Time:
- less than 30 minutes to make
- an hour or two to dry

To begin, students will have a cut out of a candy cane (you could change up and use a different shape). The candy cane shape works well because you will not need a hook later on to hang it on your classroom tree. I pre-cut the shapes to save time. You could work on some fine motor skills by having the students trace and cut their own candy cane.

I make the shape using cardstock for durability. However, you could get away with construction paper.

Then, students scrunch up the pieces of tissue paper, dip them in glue, and attach them to their candy cane. Viola! Done! I cut the tissue paper into squares, but you could have students tear pieces to add a bit more texture to the ornament. 

The students will come up with their own create ways to decorate. Some will stick with traditional colors and patterns. Others will take creative liberty. 


easy candy cane ornaments elementary classroom
Work in Progress
easy candy cane ornaments elementary classroom
Partially Done Candy Cane Ornaments
Once dry (they will dry in less than a day) you can hang them on the tree. Before the Christmas break comes to an end have students wrap them for a family gift!

easy candy cane ornaments elementary classroom
Finished Ornaments
easy candy cane ornaments elementary classroom

easy candy cane ornaments elementary classroom
Class Christmas Tree
The simplicity and ease of these ornaments helps bring some Christmas spirit to your room without the angst and annoyance of days-long projects. With minimal mess and maximum "wow" you too can create ornaments that rival "that teacher" down the hall that makes Santa's elves look like slackers.

easy candy cane ornaments elementary classroom
Merry Christmas!

Giving Thanks 2018


My first love is art. In fact, I started my college career pursuing fine art. But after obtaining my 2-year degree, I switched paths and finished my bachelor's in elementary education. I love teaching, too. There is no question--- I made the right choice. However, there are days when I want to immerse myself in colors and lines, to create and experiment, to bring my love of art to my students. The struggle is where to find the time (and the resources).


That's where Art With Jenny K comes in. No matter what I want to do, she has something that will work! Her detailed, easy-to-follow instructions help guide me to guide my students and the results are nothing less than spectacular.

Here is a small sampling of what she offers:

COLLABORATION POSTERS
My students love these. They love contributing to something bigger than them. It is especially gratifying when they start to assemble the final product and are guessing at what it will be. When we complete collaboration posters of famous people, the discussion always turns to who the people are and why they are famous. I love it when they are stumped my someone and then race to the computer in order to Google the name.

Black History Month

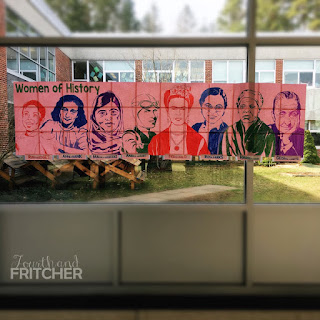
Women's History Month (I printed the grid on pink paper)

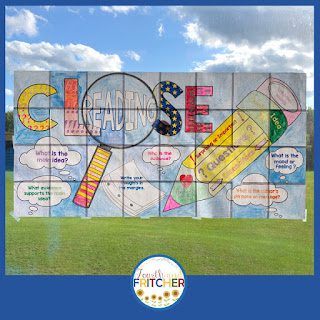
Close Reading (this was a great team-builder to kick off the school year)
You can find these and more here:

DIRECTED DRAWING
I love this little bunny freebie. It was a perfect project to complete just before Easter. The step-by-step instructions gave students enough support to feel accomplished yet enough creative freedom to make it their own. Every student brought his/her bunny home with a smile of pride on their face. I went a bit beyond the usual colored pencils and/or crayons and had the students mix the media. They were encouraged to use watercolor as well. The results were stunning!


This little cutie is at the following link:
Other FREEBIES are here:

BEAUTIFUL BULLETIN BOARDS
Bulletin Board. Just those two words can send a shiver down a teacher's back. I don't worry about them anymore. If I am in a pinch and need something seasonal and authentic to the students' work, Jenny K has some amazing things available! 

I will disclose that neither board below was a quick project. Both took a bit of extra time. However, that is the trade off for beautiful student work that has a better chance in a memory box rather than the garbage.

This pumpkin project was brought to my attention because I subscribe to Jenny's email list. I highly recommend you scooch over to her blog and sign up! Click the link below and fill in the fields on the top right portion of her blog.

This template came through my email one morning and I decided to give a whirl. It was multi-step and required thought, precision, and grit. When completed, I used the pumpkins to create a fall bulletin board. The staff and other students loved the board and my class was constantly complemented on their efforts.
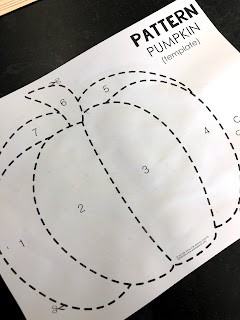
The Template
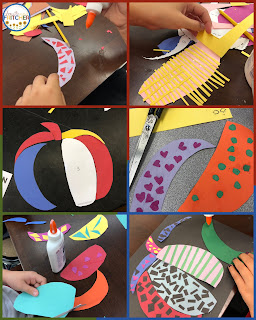
Pumpkin Creation (2-3 days, 30 min/day)


You can find the template for the pumpkin project here:

Agamographs are a struggle the first time you make them. But if you stick to it, the students will get faster and more precise each time. I love the challenge this art project offers. Students need to work fine-motor skills during the coloring. Then, they need to use precision and patience to get them folded correctly. An added bonus to this project is the ELA component. Students research the holiday and write down a few facts to share. The facts are displayed underneath each agamograph.

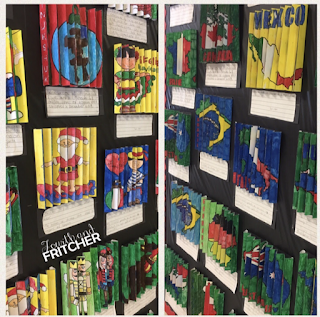
Christmas Around the World Agamographs

You can find more agamographs here:

Similar to collaboration posters are Jenny's Famous FacesUnscramble Portraits. The difference is the students can work independently to complete them. They are smaller than a poster and are completed a little more quickly.

For Pi Day last year I had the students complete an Albert Einstein Unscramble. The directions included more than one option so that students of different abilities were able to successfully complete the portrait. Some students chose to use the preprinted drawing, other students chose to take on the challenge of drawing the lines themselves!

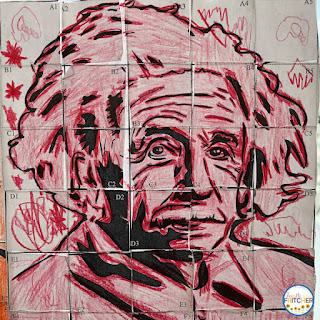
Completed using the preprinted drawing.

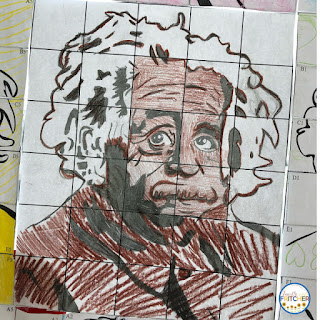
Completed using the grid to draw the portrait!

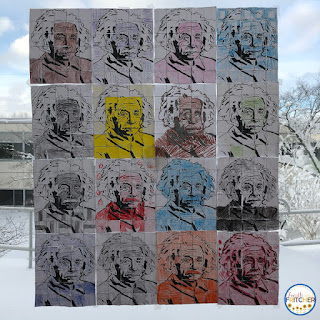
The collective result!
More Famous Faces Unscramble Portraits are here:

Now, aside from all these amazing art projects, she also offers art-infused lessons! No matter what you are looking for, she has it! For students who are artistically-inclined, the combination of content and art is a nice break from the constant barrage of curriculum that can sometimes happen when we are trying to get through the material. The switching back and forth between the hemispheres in their brains helps keep them charged and engaged. 

Jenny teamed up with Mary Beth from Brain Waves Instruction to create a wonderfully balanced resource that incorporates differentiated passages and artistic response.
I have used a lot of these non-fiction reading comprehension passages. It is especially helpful that they are leveled. These passages are quick print-and-go. Love, love, love them!

To see even more of what Art with Jenny K can do for you, click the link below, explore, and don't forget to click on the GREEN STAR to follow her. You won't be disappointed!

Thank you, thank you, Jenny K! My class, my bulletin boards, and I are so very grateful for the beauty and art you bring to our classroom year round.

Happy Thanksgiving!

Creating One Anchor Chart for Multiple Classes


There are pros and cons for every scenario in teaching. If you team, it has its fair share of the yeas and nays as well. For instance, I absolutely love having fewer preps. The caveat to fewer preps is that I will be teaching the same material more than once. And, I'm ok with that too. However, when creating anchor charts for multiple classes it can be a bit tricky.
Anchor charts are most effective when they are built with the students. Students have an opportunity to construct their own meaning because they are part of the process during which the chart is built. The words and information comes from them. Anchor charts give students an opportunity to see their own ideas reflected back to them. 

I love building anchor charts with my students. But, I don't want to hang multiple charts of the same information; especially when the topic is identical and the responses are similar enough that more than one chart would be redundant. So, what's a teacher to do? 

To begin construction of the chart, I present the same blank page with the heading/icons already written on the top. For example:


Then, I move the students through the construction of the chart. I have students submit ideas on sticky notes. Once they have written their ideas down, discussed, and edited notes, I collect them. Depending on the lesson, I then lead the students through the notes and how they apply to the chart. I will also put the notes into similar categories or ideas and then hand write the student responses on the chart. When I hand write the ideas I will use different colored markers to indicate which ideas came from which classes.


You can read more about how I use STICKY NOTES in my classroom here:
4 Ways to Use Sticky Notes

To read about the Acceptable/Unacceptable Anchor Chart, click below:
Refocusing for the Rest of the Year


Must-Have Classroom Tools

must have elementary classroom tools

Do you have a favorite tool? Ya know... that one item that you use constantly and can't imagine your classroom without? Below I share the three "must-haves" for my classroom:

1. A Super Sharpener

This item was a gift from a parent a few years back. I had been through at least a dozen throughout my career and the current sharpener was on its last legs. At Christmas, a parent surprised me this sharpener (along with a 2 year warranty) and I haven't needed another one since!

It has an adjustable wheel to accommodate 6 different pencil girths. It's fast. It's sharp. A blue light signals to the students when the pencil is completely sharpened. And the shavings tray helps keep the area tidy. 

It's a bit pricey- but it's the last sharpener you'll ever buy. 


must have elementary classroom tools


2. Heavy Duty Hole Puncher

I bought this hole puncher a few years back. There were some changes happening with curriculum, an influx of 3-ring binders being used, and I bought it with the idea that I would be able to hole punch a class set of copies all at once. 

Over time, I have used it to hole punch other items as well. For instance, I can place up to 5 laminated brag tags under each punch and hole punch 15 brag tags at once. Two rounds of punching and I have a class set of tags ready to go!


must have elementary classroom tools


3. Paper Cutter

This item was a splurge. It was costly and ate up a hefty portion of my budget. However, it is worth its weight in gold. My classroom runs on interactive notebooks- a lot of interactive notebooks. I mean... a lot. 

One of the perks to interactive notebooks is the amount of practice students get while cutting and folding and gluing and positioning pieces. One of the drawbacks is the amount of time the cutting, folding, gluing, and positioning requires. My paper cutter helps cuts down on the time. I can trim down the majority of the pieces so that students can concentrate on getting the information on the piece and into the notebook.

A paper cutter is also useful for cutting up name lists, trimming down paper for craft projects, cutting up brag tags, etc...


must have elementary classroom tools


Granted, I can locate similar items within my building. But who wants to trek down to the teacher station every time they want to punch holes or cut some paper? Having them readily available in my class is a time-saver.

There is no question that these three tools help make life smoother in my classroom. What are your go-to tools?


must have elementary classroom tools


Using Reward Tags to Increase the Home/School Connection


I started using reward tags a couple of years ago. At first I was dabbling, using the usual: first day of, monthly icons, character ed, attendance, etc... However, last year my tags took an unexpected turn. 
Start with the basics!
Multiplication Reward Tags.
Students earn a tag for each factor.
At the beginning of the year I explain the tags and the Class Dojo. Then, I connect them. Once a student has entered the Class Dojo, they earn a tag for their chain. It's a great motivator for the students and the bonus is that families are linked in and can see what's happening in the classroom.

Offering a tag for connecting to your digital platform is a great motivator!
Without a lot of forethought I put up a weekend challenge that asked students to clean their room. If they did so, and posted a picture to our Class Dojo, they would earn a Reward Tag on Monday morning. The students loved the challenge! I was surprised by how many were willing to complete the task and post to our Dojo. I am not sure which facet was the ultimate motivator: the tech or the tag. But I decided to keep going.
I wrote the Challenges on the Homework Board each Friday.
Then, I would take a picture and post in the Class Dojo.
Over time, I started to get more organized and creative. Weekend Challenges became family affairs. My goal was to create challenges that were seasonal/timely, required minimal time, and cost little or no money. Parents started to comment on the challenges and Monday mornings included some fun story telling.
I would also create graphics to post in the Dojo. 
My students keep their Reward Tags on a chain stored in the classroom. At the end of the school year they get to take home the chain and the items attached to it. While most of the items on the chains are the brag tags, I occasionally use charms from Fitness Finders. If only a handful of students complete the challenge, I will reward with a charm instead of a tag. I don't tell the students which weeks will be a tag versus a charm because I don't know the number of participants before Monday morning. 
A crazy blend of tags and charms!
To help me stay organized, I plan out tags a few weeks in advance. I prefer to print, laminate, and cut in bulk. For storage, I keep the tags (and charms) grouped and in a plastic compartment bin. The bin you use may differ from others' depending on the size of your tags. 
Print, print, print.
Laminate, laminate, laminate.
Cut, cut, cut.
The printing and cutting isn't so horrible. The lamination is another story. I have a small laminator in my classroom. But, the reality is, lamination costs money and takes time. So this year I am trying something different.

Instead of using chains and tags (which require lamination to endure the school year), I have created a "Reward Tag Cache" sheet. Each sheet will hold 10 Reward Tags. Students will keep their sheet in their folders. Once they have earned a tag, students will glue them onto their sheets. This will eliminate two things: the need for chains and the need for lamination! Students will need more that one cache sheet so I will print them two sided. Hopefully, the idea of filling a cache and needing another one will be an additional motivation for the students!

You can find a freebie sample of September Reward and the Reward Tag Cache sheet here:
The September Tags include:
Best Book
Family Walk
Game Night
Spiffy Room
Favorite Subject

Sheets are designed with 15 tags per sheet. For my class size, I need to print two copies of each sheet. I am offering them in color and black and white. So, if you don't have access to a color printer, or want to save on ink, you can print the black/white tags on colored paper to add a bit of color to your tags. Alternatively, if you decide to use the Reward Tag Cache, you can print on white paper (or card stock) and have students color in their tag!


Additional Resources and Ideas for You and Your Classroom
Click below to be directed to: 
Multiplication Facts: The Superhero Challenge (resource that includes directions, probes, posters, student progress monitoring chart, tags) 

Click below to read more about how I use Class Dojo in my classroom:
How to Create the Best Home/School Connection With Just One App


I hope you find incorporating Reward Tags into your classroom to be as rewarding as I have. Enjoy!

SMART Goals for Elementary Students

Do you use SMART Goals in your classroom? I started using them a few years back after I had visited another classroom and saw an interesting "goal" board on the wall. Happily, I had an opportunity to talk with the teacher and she explained that it was where students posted their own personalized goals. At that point I had never heard, nor seen, anything like it. But, I knew I wanted it for my class too.

I started to do a bit of poking around. I found a few different goal setting systems, but I was drawn to SMART Goals the most. I decided to pour my efforts into this method because it was clearly designed and student-friendly. 

For our purposes, I used the acronym SMART to stand for the following:
S = Specifc
M = Measureable
A = Achieveable
R = Rewarding
T = Time

To start, I set up a Goal Center. I like to post the different components of a SMART Goal so the students can refer to the poster when setting their goals. Students are also given a mini-version of this poster to keep in their Data Folders.

The Goal Board was made using an old perpetual calendar. I simply added a bulletin board border around the perimeter and hand-lettered a header. I also laminated the entire board for durability.

The Goal Center
Every year, within the first few days of school, I explain to students the idea behind SMART Goals. Each student has a Data Folder that is housed in a specific area of the classroom. Students set, reflect, and monitor their goal-setting each week. I typically set goals on Monday with the due date being either that Friday or the following Monday. The first few weeks it can take a bit longer. Some students have never set goals and they need a lot of modeling to become proficient and confident in goal setting. 

I encourage students to set goals that are within the educational setting. They can set academic or social goals. The goals should be something they are able to control. 

Examples of specific goals students can control:
"By Monday 9/10 I will read 5 chapters of Harry Potter #1." 
"I will complete my homework every night this week."
"By Friday 9/14 I will master my multiplication facts for the number 5." 

Examples of goals they cannot control or are too vague:
"My team will win kickball during PE."
"By Friday I will be better in math. 
"By next Monday I will read my book."

The Goal Board Redesigned

4 Steps to Using SMART Goals


1. Set the Goal

Students write their name, a "due" date, and a goal on a sticky note. At the beginning of the year, I will read/review each goal to ensure it meets all of the SMART criteria. Some students will need to rewrite the goal. However, as the year progresses, students are better able to write and monitor their goals independently. 

2. Post the Goal

Students place their goals on the board.

Student Sticky Notes on the SMART Goal Board

3. Reflect on the Goal

The following Monday (or due date) students will get their Data Folders, their sticky note, and reflect on the goal. They place their sticky note in the designated space on the reflection sheet and answer two parts: Did I meet my goal? and a Reflection Section.

4. Prepare the Next Goal

Students keep their goals throughout the year. They have a goal sheet that is given to them at the beginning of each month. I color-coordinate mine for organizational purposes. Keeping their goal sheets helps students look back on the goals they set for themselves at the beginning of the year, to compare where they are current to where they began, and to possibly set up some long term goals.

Student Goal Reflection Sheet
You can get the posters and goal sheets I use in my classroom for FREE in my Teachers Pay Teachers Store by clicking below:

SMART Goals FREEBIE!


Happy Goal Setting!