Spring is here! And, what could be described as the longest winter ever experienced (figuratively), it is time for some color and life. I invite you to grab some daffodils and give you and your students a much needed hands-on experience that celebrates the spring, new life, and is content-driven too!
It seems like students have been learning about plants since they started school. But you can only grow bean plants or complete plant parts on a worksheet so many times. One year, I took the plunge and dissected real flowers! It was a simple and inexpensive way for the students to learn about the plant parts and their important roles.
I did this activity with my class working in pairs; so that cut down the amount of flowers I needed by half. Our school grounds are covered with perennial flowers that we were allowed to use for FREE! If you don’t have flowers at your disposal, then a local flower shop might provide flowers at a discount or as a donation. You could even plant some daffodil bulbs to be ready for next year!
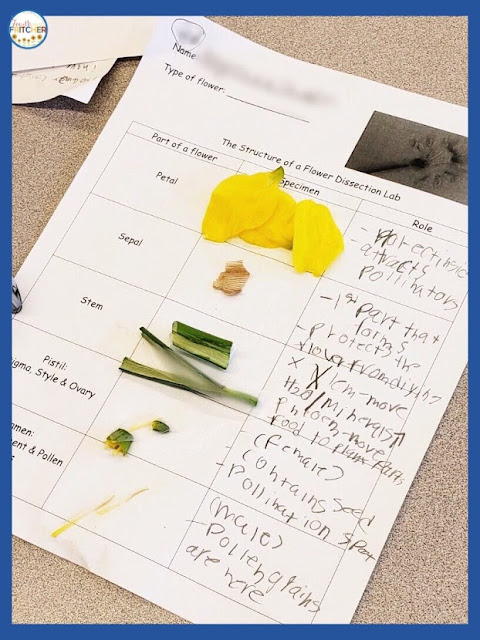
We made a very simple chart that provided places for each of the dissected flower specimens and some notes. On each table I had a variety of tools for them to choose from. Their choices included tooth picks, tweezers, magnifying glasses, scissors, and clear tape.
 |
| Simple Note Sheet for Daffodil Dissection |
This activity would be great as a teacher-led center but it ran smoothly working as a whole group too. We did this activity using an "I Do - You Do" format. This format gave students an opportunity to watch and listen before they attempted each step. The steps I used are outlined below.
Dissecting Daffodils
1. Discuss the Petals
We discussed the role of the petals, counted and commented on the number of petals, and peeled off one of them. We carefully taped a petal to their dissection chart.
2. Discuss the Septal
I asked studens to consider why the septal wasn't green. As I peeled off a piece I told them that this is the first part that forms. They then concluded why it was dried and I told them it helps the plant stay moist during its life.
3. Examine the Stem
Using the magnifying glass, I modeled where to examine the stem. I cut it at an angle and discussed the roles of the phloem and xylem.
4. Cut Around the Cup
Once the first three parts were done and taped on the specimen chart, I had them cut around the cup (or corona) of the flower.
5. Remove the Stamen
Now that the pistil and stamen were exposed, I had them take off the stamen specimens first. There was enough for each student to take a filament, an anther, and pollen grains for their chart.
6. Discuss the Role of Pollen
We discussed the role of the pollen and the male parts of the plant. They noticed that the pollen is deep down into the flower parts.
7. Remove the Pistil
The pistil was now ready to be taken off. Since there was only one, the student pairs split the style in half in order to have a portion for their chart.
8. Cut the Ovary
After the pistil was gone, they were very curious about what was inside the bump at the top of the stem. I had students cut the ovary in half so they could share and see the ovules inside. Many described it as looking inside a green pepper.
Once all of the specimens were taped, I had the student toss the rest of the flowers that remained. As we started taking notes on the important roles of each section of the plant, the students discussed what they noticed and still wondered.
The students loved this hands-on learning! It made a huge impact on them but not on my wallet. In the days that followed we continued the daffodil fun with a directed drawing of our new favorite flower.
We followed the steps as described here: How to Draw a Daffodil
Instead of using just markers, crayons, or colored pencils to add color, the students had the option to go a step further and use watercolors.
The results were beyond my expectations. I couldn't wait to get them up on the bulletin board for the whole building to enjoy. The students' work brought color and life to our hallway for quite some time. I eagerly await the opportunity to repeat this fun and hands-on classroom experience again!